

fishy or fab?
Minimalist, instant, kinda pretty, and absolutely free: the Tuna Can Seder Plate.
Not as instant as my Hub Cap Seder Plate or repurposed escargot platter because it does require the consumption of six cans of tuna, but a Tuna Can Seder Plate is more practical: it can be modular or one-piece, it can sport 5 or 6 separate cups for the symbolic foods, and it is made of trash.
I rather like the plain cans—no text—but kids and other learners can create a disc to fit inside each cup to indicate the symbolic food to be placed within. Show a good model so that the symbols are arranged in the right order (see my post about placement, here).
A disc of what? Anything, really. Paper is easy. Kids can trace a circle that will fit inside the cans. Bite your tongue when they trace around the outside of the can, because they need to find out that an exterior dimension may not equal an interior one, and this is an excellent time to notice. Decorate as per whim and spell as per examples in my post about symbol placement.
Feel free to let kids laminate, Mod Podge, contact-paper, or otherwise seal the decorated circles before inserting into the empty cans. Some of us would rather chew cut glass than use Mod Podge, but some of us must restrain ourselves from sealing everything within reach. It’s all good.
Or, instead of paper, trace circles onto something durable and waterproof like the covers of an old vinyl folder, or even scraps of craft foam or parchment (baking) sheets. Draw the pictures with Sharpies so the art doesn’t run. Or shoot, just draw inside the can with Sharpies (erase mistakes with rubbing alcohol). Metallic Sharpies would look cool inside or out.
The food names can also be written or glued onto the outside of the cans, so everyone at the table can see.
Kashrut: This baby is kosher for Passover if the tuna is K for P. And if the tuna wasn’t K for P, consult your authority. Don’t ask me: I use snail platters as seder plates.
HOW TO:
1. Eat the tuna.
2. Remove the paper label. My fancy gold cans (Starkist albacore) are glued in only one spot. If you can figure out how to remove the ink printed directly on the can, TELL ME (neither rubbing alcohol nor acetone will shift it).
3. Wash cans. I ran mine through the dishwasher so that the dog would be less interested.
4. Decide if you want modular or connected dishes.
5. To connect: use high-temp hot glue or epoxy or any glue recommended for metal to metal. Clip top of cans together while glue is drying (use bull-clips, which can actually be used instead of glue, if you want a temporary hold).
To keep spacing accurate for a 6-h0ler, use a 7th can in the middle of your design as a spacer, even if you don’t end up gluing it there.
Such as in the pic below:
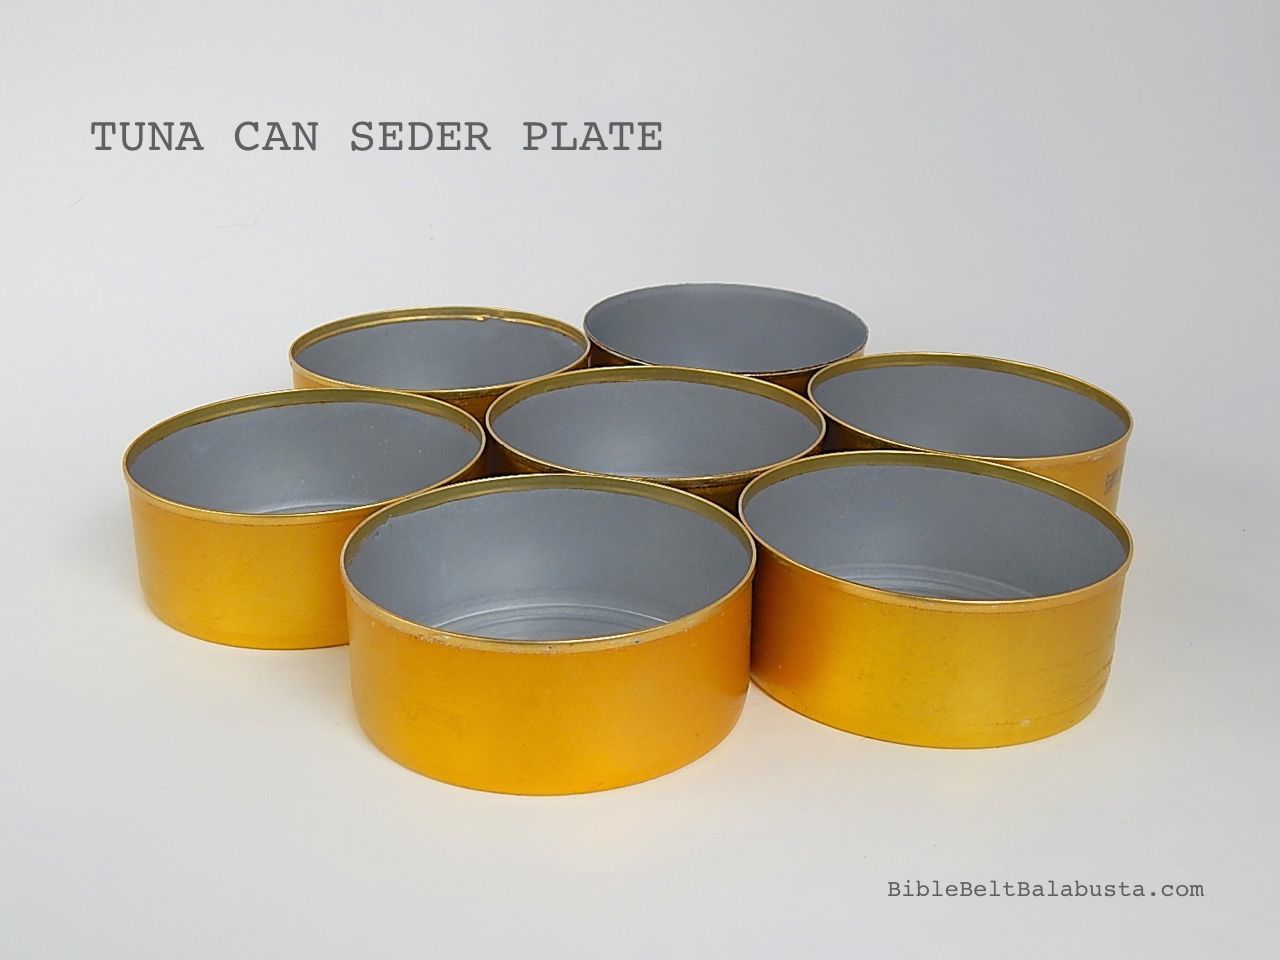
Center can acts as spacer while gluing. Keep it for decor or remove.
Aesthetics:
If you don’t fancy the plain exterior of a tuna can, a quick Pinterest consult will reveal far too many ways to gussy up any can: decoupage, mosaic, string/fabric wrap, paint, and so forth.
Pinterest is full of boards dedicated to the re-use of tuna cans, and I hope my seder plate can join the party.


I don’t even understand why yet, Joanna, but this idea totally knocks me out! I’m going now to get 2 tuna cans out of the recycle bin. I’ve got time to eat the rest in a coupla weeks. One thing I know I love is being able to set up this Seder plate at the other end of the table, so that everyone will be able to see the symbols easily. WOW! (I told my hubby about the escargot plate idea and he got a good chuckle from that one, too.) Thanks for your genius.
And I am thrilled that YOU are thrilled about pulling tuna cans from the recycling bin and are thinking up ways you can eat through 4 more! Let me know if you come up with a kid-friendlier way to glue them together.