
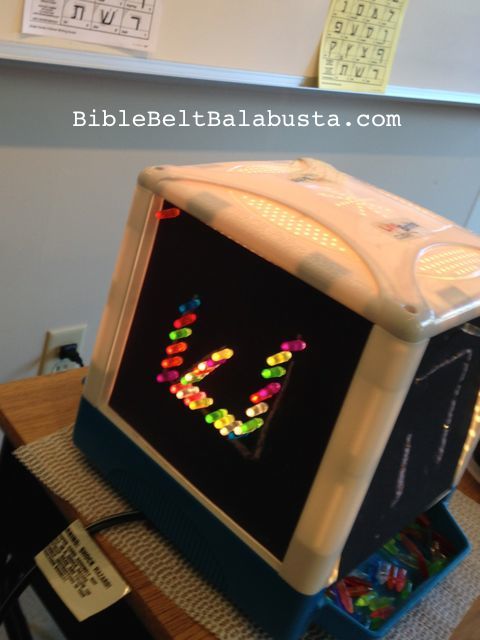
Lite Brite shin
Maybe it goes without saying that teachers of Hebrew letter formation can borrow the huge bag of tricks devised by teachers of English letter formation, but I’m saying it. A quick online search reveals oodles of brilliant alphabet ideas, and all we have to do is modify for aleph-bet. No need to reinvent the galgal.
A sensory activity can be as simple as you wish: simple in terms of content and in terms of prep. Is isn’t that hard to throw a bunch of wooden coffee stirrers in a basket and ask a kid to arrange them to make a letter. Actually, this was a favorite of my First Grader. He loved being able to break the stirrers to length, because it isn’t every day he is encouraged to break anything. (By the way, arranging the sticks onto a tray lined with felt, craft foam, or puffy shelf liner makes the task more satisfyingly tactile.)

Coffee Stirrer letter
The one thing you must absolutely have is an example of each letter. Ideally, I’d use block letters to cut down on curvy confusion, and even better, block letters with directional arrows. For photos in this post, I used the big letter cards I already had, which are not block, but which accompany the pre-primer we use at school: Kadimah. See NOTES below for links to good letter charts.
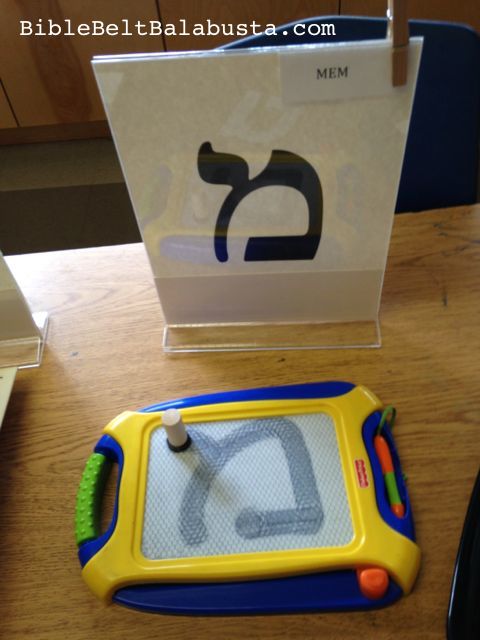
MagnaDoodle mem
I divide my activities into Writing and Building. Writing can be with a finger or anything that makes a mark (marker, chalk, crayon, paint, oil, etc.).
Building can be with…anything. Oh, how I love to build.
Material can introduce and reinforce vocabulary: build a lamed with Lego. Roll a chet with chomer (clay) or draw it in chol (sand), and even better, make the clay or sand brown (choom). Or just keep it to color words if that’s where your kids are: make the yud green (yarok) or the samech purple (sagol), etc.
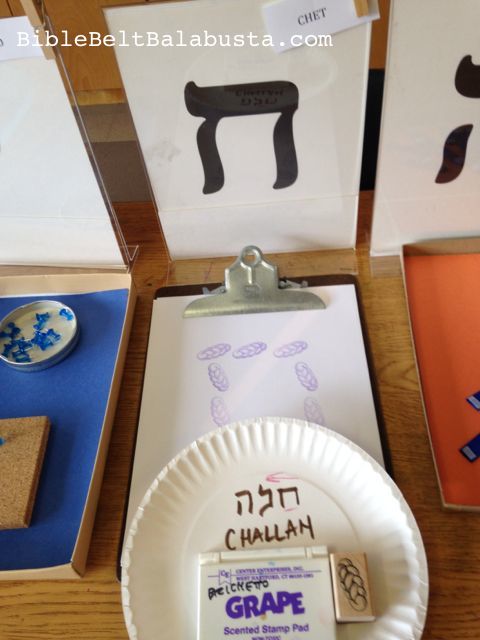
When I taught First Grade at a Conservative Synagogue, I took it slow and steady: one letter every Sunday with a different sensorial activity for drawing or building (and sometimes eating) that letter. The materials were tailored to Kadimah vocabulary, so a gimmel was made by by writing with chalk/gear on a wet slate, by building with sticks of gear flat on paper, or built by fitting gelt coins into a gimmel outline. Another example is the chet we each made from challah dough: we mixed and rolled into chet shapes, then baked and ate (with chummus-hummus)—another chet word—while we sat under a chuppah with a chatul (cat).
Now that I teach Art classes in half-hour chunks, I can’t do slow and steady. But, I can do fun. Because my students get Hebrew down the hall, my role is to complement what they learn elsewhere, which means I get to play. My dream is to create an event with multiple letter stations in one room, where kids walk from station to station creating each letter, keeping track on a personal checklist. A Hebrew Letter Carnival. Will there be a ton of learning with this rowdy event? Maybe not, but some kids will make unexpected connections with material already covered, some kids will get a compelling intro to new letters, and hopefully, everyone will have a good time with Hebrew, which is always a good thing.
I created a small, exploratory Hebrew Letter Carnival last year, just to test out some ideas on K-3 students. Please note that every task is self-contained on a tray. The Monetssori in me demands it. I also try to avoid unnecessary distractions (by “isolating difficulties”) when faced with a choice of colors or materials. For example, all the push pins of a single task are the same color, as are the marbles or magnets at another task, etc. A few of the tasks produced something to take home (a rubbing, a drawing), but for the most part, the explorations did not generate an end product. We took photos to show parents that the kids did indeed do something in art class that day.
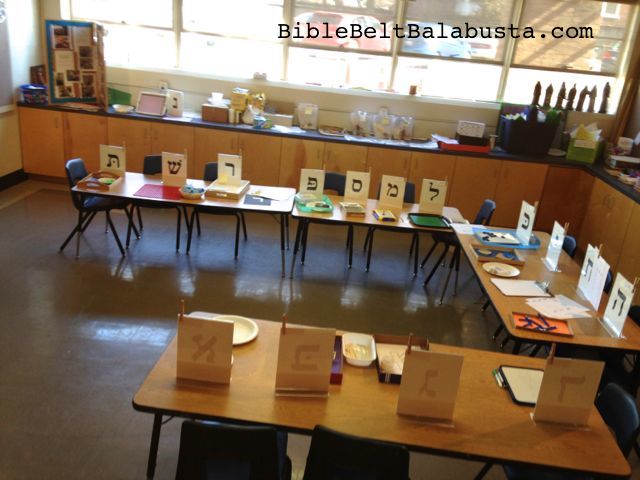
our exploratory Hebrew Letter Carnival
Every kid carried an alef-bet checklist and kept track of the letters created.
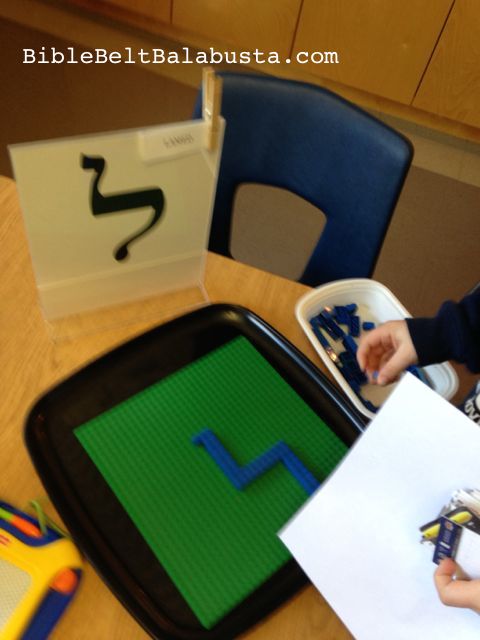
Lego lamed
Here are some of the favorite Building and Writing activities we tried, with details:
BUILDING:
- LEGO (of course!): with a large (at least 32 x 32 stud) baseplate and a bunch of bricks. Bricks should all the same color, but not the same color as the baseplate. I used blue bricks on a green base. Choose mostly 2×4 bricks, but throw in some 2×2, 1×2 and maybe some 2×6 and 2×8 for variety and for making details like a serif or dot.
- Lite-Brite: Kids push multi-colored pegs into clean sheet of dark paper on a Lite Brite. I have two kinds: a classic version and a 4 sided cube. We used the cube like a dreidel, with nun, gimmel, hey, shin going around in the correct order. Note that dark paper makes the colored pegs much more satisfying. I started with a chalked letter template, and then I let the kids make their own letters in whatever size, and it didn’t matter how many “mistake” holes they made.
- Coffee Stirrers: buy wooden coffee stirrers in bulk at a food supply place (like Sysco…or maybe a warehouse club?). (Raw fettucine would work, too.) Allow kids to break some, but once a few have a turn, you won’t need additional short pieces. Use a felt sheet (or similar) to give the pieces more traction on a tray.
Note: Craft sticks (popsicle) are too thick, so you’ll have to break them yourself in advance and use a bit of sandpaper to file the snags. - Push Pins in cork board square: all same color pins. Corkboard squares are at Walmart, Target, office supply stores and Michael’s. I had to glue 4 thin squares together to be sure the pins didn’t pierce through to the back and hurt kids.
- MegaBloks (toddler size) on Duplo baseplate: This one is nifty because kids build vertically, not flat upon a surface. They have to envision a letter in a different plane, which can be weird. I chose a single color of the single blocks, with an ordinary Duplo baseplate to anchor all. I watched to see if anyone figured out how to add the “dot,” but they didn’t (I added a white block as negative space, to separate the letter from the dot).
- Clay and marbles: Kids push marbles into thick layer of playdo, then remove marbles and smooth playdo for next student.
- Magnets: Kids arrange magnets (all same color) on steel sheet (cookie sheet, dry erase board).
- Pretzels: Kids make a pey from stick pretzels (Snyder’s Sticks are OU kosher). If they have to shorten a piece, they get to nibble. (A white paper plate is too blah. Next time I’ll use a piece of felt.)
WRITING:
- Dry erase board (personal size) w/ dry erase markers. Next time, I’ll use dry-erase crayons, which require more friction are more fun to erase.
- Sand (thin layer inside cigar box). Write with finger, then shimmy to erase.
- Rubber stamp, stamped into pattern that makes a letter (I used a challah stamp to form a big chet)
- Magnet: Drag a magnet onto a MagnaDoodle.
- Rubbing: Kids place a diecut letter (made of construction paper) under a sheet of printer paper and rub with side of a crayon. We rubbed a resh.
- Oil: cotton ball with shallow bowl of olive oil, plus colored paper. Not much room for error with this one, so I use small pieces and do-overs. Shin for shemen (oil), of course.
- Slate with chalk, because some kids have never used a chalkboard!
- Splatter paint (or blow-pens): use a die-cut letter as the positive image, then splatter tempera paint to create a negative image. Place the paper at the bottom of cardboard box to contain mess.
Most difficult?
•Perler bead activity: round template with a single color of perler beads. Kids needed an excellent pincer grasp and tons of patience.
Least favorite?
•Big craft sticks I painted blue and then tipped with velcro on ends and sides. This idea is all over the Internet, but my kids were not interested, and neither was I. I vote for stiff sticks of all-over velcro, with no wood showing at all. Now that would be fun.
Rubber stamp letter
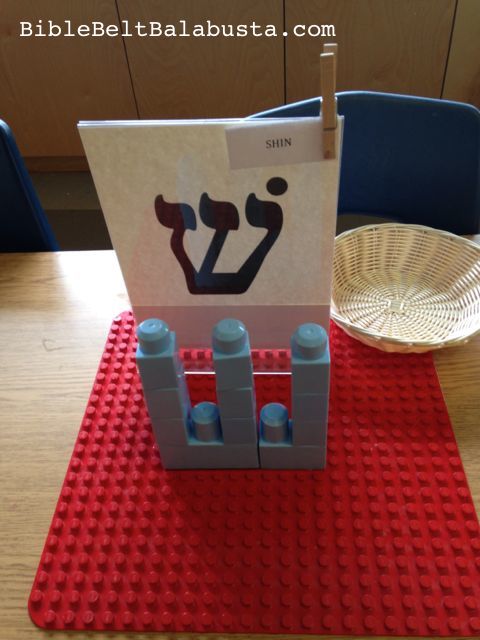
MegaBloks letter (on Duplo baseplate). Vertical build!
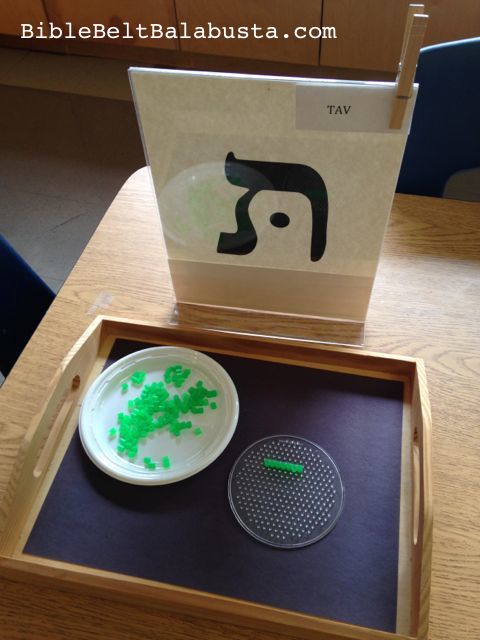
Perler beads on template (voted most difficult)

Clay and marble letter

Rubbing resh
NOTES: Do see the 30 Sensory Activities to Learn the Alef Bet produced by the indefatigable Mommzy at Our Jewish Homeschool Blog. She’s placed it at another site: Teachers Pay Teachers, but it’s still free.
HEBREW CHARTS READY TO PRINT ONLINE:
Behrman House Publisher has a printable Hebrew Writing Chart pdf. Note that some of the letters are still slightly curvy. Very young kids may need help interpreting the curves into straight pieces of material.
EKS Publishing Co. has a great chart: “Handy Hebrew Writing Guide.” Includes names of letters. This is my favorite. All letters are composed of strictly straight lines, which makes it easy to interpret into straight pieces of material.

Hebrew Writing Chart from Ahklah.com
Akhlah.com offers this chart with directional arrows that show how to write (or form with materials) each letter. Unfortunately, there are no letter names, so it assumes prior knowledge. It’s a pdf ready to print.
Akhlah.com also has this nice pdf to print, which shows the letter names, but the font is the fancier block kind, like you’ll find in a siddur (prayer book), plus the script (cursive).


Amazing, wonderful idea. I can’t wait to try out some of these ideas with my class. It would be so much fun for family days, too.
These are great! Thanks for sharing.