

DIY shofar
Cheap, quick and irresistible to honk: the Party Horn Shofar. I tweaked this classic to meet a specific goal: to produce a “realistic-looking” shofar that will not offend the sensibilities of a certain group of students who feel themselves too mature for stickers and glitter. I also needed horns easy to “sound” (some brands are hard to blow), so that we’ll be able to practice the real shofar calls without getting unduly crabby.

pre-decoration modification
Materials:
Real shofar to look at and try (ideally)
Party Horn (6 for a dollar at Dollar Tree)
Tissue paper (I used browns)*
White glue (diluted) or liquid starch
Paintbrush for glue
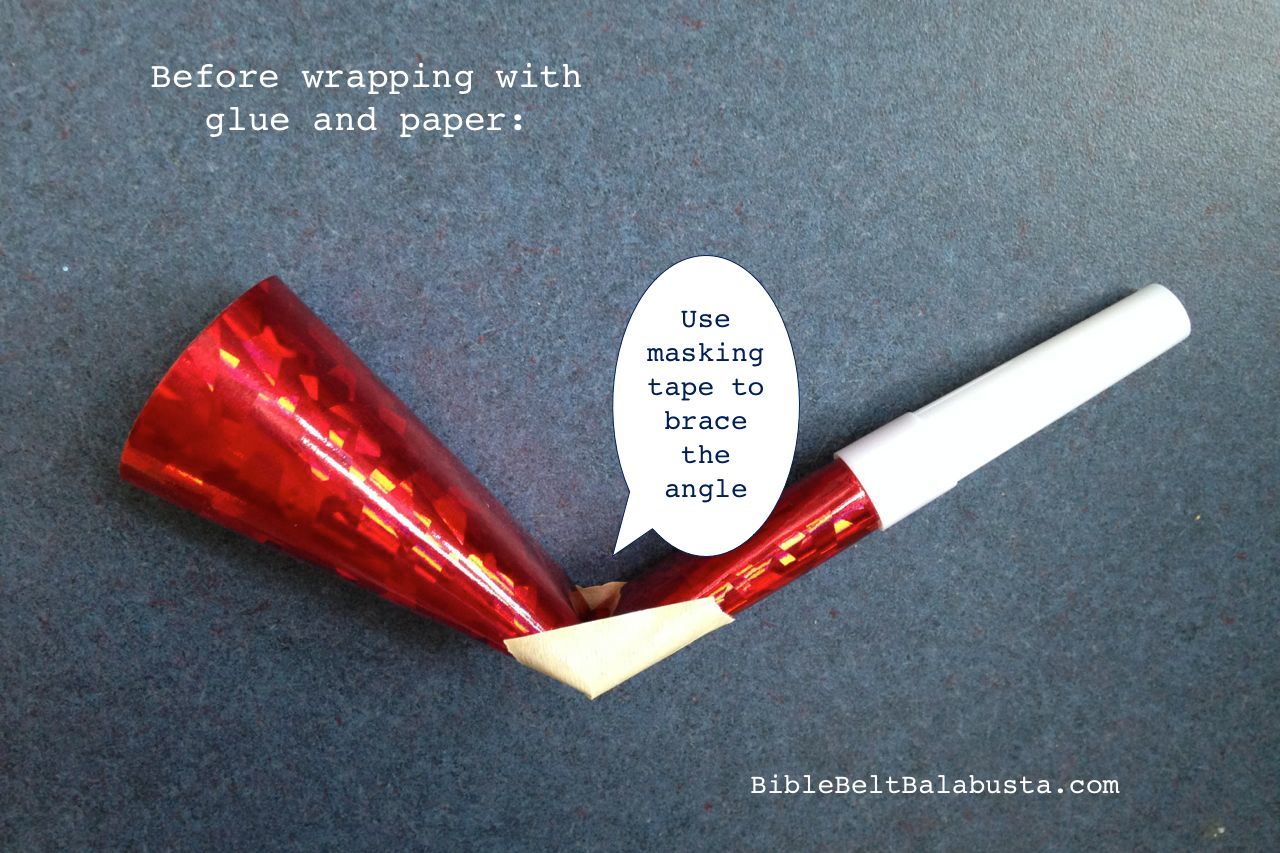
Masking tape to hold middle fold before wrapping
Abridged Version: Buy cheap party horns. Make creases in the bell as directed in the photo above. Make sure the middle bend is not severe enough to block the air flow or the horn will not work. Let kid paint the horn with glue and wrap with strips of colored tissue paper. Let it dry. Play.
My Version, suitable for groups of children and one meticulous adult with but half an hour of class time:
ADULT PREP:
1. Go to Dollar Tree and try to only buy party horns. Resist everything else or Dollar Tree becomes Thirty-Dollar Tree within moments.
2. Test each horn if you have children/students who will freak out if the horn is too difficult to blow. The brand I found will honk with just a smidge of air, which is all my kids are willing to give. (I still had several duds and I’m glad I bought extras.)
3, Pinch the horn in two places. This is much easier to show than to describe. One bend is halfway up the bell at a 45 degree angle. I used masking tape to hold it steady. The other is at the large opening: just pinch it shut, crease it, and release. Do not let the bends restrict air flow or make the horn too difficult to honk. (Notice the two folds are in planes opposite to one another. One is latitudinal and one is longitudinal. Let me know if there is a more accurate way to describe this relationship.)
KID WORK:
1. Kids tear strips of tissue paper: 10 to 15 strips. Neatness does not count.
2. Kids paint horn with diluted glue, then wrap and smoosh layers of paper onto the glue. Repeat until original color of horn is obscured. Wrinkles are good: they make the horn look more real.
Make sure the horn still has the two creases.
Let dry. This part will take forever, so go do something else in the meantime.
3. Practice the traditional Shofar sounds with this cute printable from Joyful Jewish.
4. We’ll be teaching the blessing, too: the bracha for the mitzvah (commandment) of hearing the shofar on Rosh Hashanah. Here’s a neat pictorial version from Gateways, Boston’s Central Agency for Jewish Special Education.

here’s the pack from Dollar Tree, and a view of the bent horn from above
Shana Tova!
*If you only have white tissue paper on hand, use that. Don’t run out and buy brown. After the shofar is dry, kids can color the white horn with any kind of paint (watercolor, tempera, poster, etc.), or they can scribble on it with “watercolor pencils” and then gently rub with a damp paper towel to smudge the lines. And so on. I’m a big fan of using what’s already in the house/classroom.


יופי מאד יצירתי תמשיכי