

Make a mezuzah from a dried-up marker.
Re-use an old marker to make a mezuzah case (and make watercolor paint, too).
See Make a Mezuzah for mezuzah basics.
See Make a Mezuzah Scroll for ways to make a “training scroll.”
Homes and classrooms go through markers even faster than they use up glue sticks. Most markers can’t be recycled, so they end up in the landfill. This nifty project uses every component of an old, broad-tip marker to make two new things: a mezuzah case and a supply of watercolor paints. The marker body, closed at the bottom with a plug and at the top with a cap, is an ideal size for a mezuzah case. The marker’s reservoir and tip, even when “dry,” still contains enough ink to create plenty of liquid watercolor for future art projects.
Both ideas came Laurie Bellet from the blog at Torah Aura, publisher of Jewish education materials and books. The details and pictures are mine. This double re-use of something destined for the landfill is thrifty, environmentally-friendly, and resourceful.
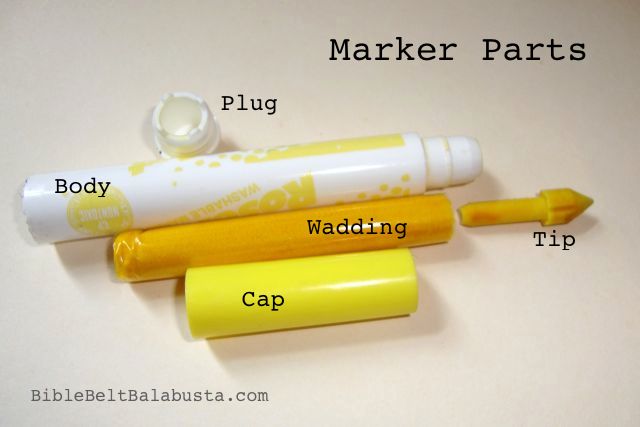
marker disassembly
MARKER MEZUZAH
You will need:
Broad-tip marker ready for the trash, non-toxic and washable
Butter knife (adults only)
Tweezers
Paper to decorate (origami, tissue, wrapping paper, child’s artwork, etc.)
Glue stick or white glue for paper
Craft stick (a.k.a. popsicle stick), optional (large or regular, plain or colored)
Hot glue, epoxy, or super glue if using craft stick backing
Thumbtack, if using craft stick and planning to mount with screws or tacks
Mounting materials (tape, putty, etc.)
Mezuzah scroll (see my page for making “training scroll”)
Note: These instructions are for a simple, paper-covered mezuzah case. Variations include using clay for an outer sheath. Polymer clay is definitely doable, but not recommended for very young children. Air-dry clay sheaths, such as Model Magic, can work for any age.
Safety: Markers are designed to be child-proof and safe. They are consequently difficult to take apart. The jimmying of the bottom plug is a job for a careful adult with a dull butterknife.

1. Remove bottom plug from marker (not the top cap). Adults (or older teens),use butter knife to wedge between cap and marker body until plug is loose enough to slip out. Marker brands vary: Crayola is fairly easy to unplug, but RoseArt markers might need a pair of pliers to help. Save the plug.

- Pull out inner sheath of wadding and save

2. Pull out colored cylinder and put aside for now. This is where a marker gets its color: a tube of dyed wadding wrapped in a thin plastic sheath. Even when the marker is so dry it won’t color well, there is plenty of wet color left in the wadding. More on this below, at “Watercolor.”
3. Remove top cap. Pull out colored tip with tweezers. Set aside with the wadding from step #2. Now, the marker case is an open cylinder with a large hole at the bottom (where the plug was) and small hole at the top (where the marker tip was). Put cap back on.

- pull out marker tip with tweezers

4. You can decide if you want to orient the mezuzah with the plug at top or bottom, but remember that the plug is now the only access to the inner chamber. Why? The marker cap covered that small coloring tip, which left a hole too small to allow passage of a scroll. (You might be able to roll one up tightly enough to get it in, but you’ll never get it back out.)
5. Decorate case. Cut pretty paper to fit marker body with the top cap on. (You won’t need to take the cap off again, because you’ll be using the bottom plug for access.) Use origami sheets, tissue papers, wrapping papers, or artwork generated by your child. Use small squares of colored tissue as decopage (like the technique from our Matchbox Mezuzah instructions), if you wish. Glue paper to case and lid. Glue stick glue is usually fine for this part of the job. You can always do detailed trimming with scissors after the paper is glued on. If you are making this a math lesson, by all means measure the marker and paper and avoid all the after-the-gluing trimming.
6. Decide if you want to keep the case as a tube, or if you want to attach a flat back (craft stick). Either type can be stuck to a doorframe with foam tape or putty. A flat back case can also be affixed by tiny nails, screws or tacks. Most jumbo craft sticks are nearly the same height as most broad-tip markers, however, which won’t leave much room for hardware. Test this before committing.
7. If you want a flat back, attach jumbo craft stick. Glue marker case to craft stick (hot glue, epoxy, white glue, or super glue). If you plan to affix the mezuzah with tacks, nails or screws, prepare a tiny pilot hole at the top and bottom of stick. Craft sticks split easily, so you’ll need to reinforce the front and back with a strip of thick tape before making pilot hole with a thumbtack. Remove the tape from the front side before mounting with very narrow screw or tack.
8. Add the letter shin to front of mezuzah. Use sticker or write with glitter glue or marker.
9. Prepare your scroll and make sure it will fit inside without folding. (See my page on how to make scroll.) Roll it up left to right and insert. Plug with bottom cap (which is probably at the top now, right?).
10. Mount. Tube: foam tape, poster putty. Craft stick: foam tape, poster putty, or with hardware fixings as per #7.
FREE LIQUID WATERCOLOR

- Watercolor from innards of dead marker

Dried-up markers make instant, free, liquid watercolor for home or school.
Take the colored inner wadding and the colored felt tip you extracted from the old marker. Put both in jar or bottle and add water to cover. Add a teaspoon of vinegar to act as a preservative. Voila: instant and free watercolor for your next art project.
Keep a separate bottle for each color, and decant just a bit into small paint cups for kids to use. Clean gatorade-type containers work well, but remove the old labels and create new ones that indicate “paint.” Otherwise, your watercolor will look like a sports drink.
Keep adding marker innards—one color per jar—as you cull your marker collection for duds. Make a small collection box for “dead markers” at home or school, and you’ll have enough for a lifetime supply of watercolor and mezuzah cases.
You don’t need to remove the wadding sheath: the color will leach into the bottle just fine, as is. In fact, if you do remove the sheath, you end up with a swollen, tampon-like floater that the older kids will not fail to notice….


Pingback: Passover PEZuzah (PEZ + Mezuzah) | Bible Belt Balabusta