
First, please read my Intro post for making Havdalah candles with kids. I’ve also got one coming for Rolled Beeswax Havdalah candles and one for the E-Z version using repurposed Hannukah candles. This one is just about dipped beeswax…

worth the work, I swear (click pic to enlarge)
To make candles with kids could be a straightforward project. But then again, to make candles with kids could also be my biggest teaching challenge heretofore, and in fact could be a Kafkaesque labyrinth in which I stagger from one surreal complication to the next. Who knew that to melt a bit of beeswax and dip a string could be so dramatic?
Lemme explain. I help 2nd and 3rd graders make personal Havdalah kits. Oh, how I love Havdalah prep: we grow and sample a buffet of herbs and spices for personalized besamim, we make spice towers, we decorate kiddush cups. Last year, I ramped up the curriculum to include handmade candles. We’re on a two-year cycle, and I figured we’d alternate between rolled beeswax candles and dipped beeswax tapers so that each students graduates to 4th grade having created both kinds.
Sounds simple, I know, but my path to the rolled candles and the dipped candles totted up hundreds of unpaid prep hours and many a migraine. Ok, maybe I’m pathologically detailed-oriented, but my hope is that if I sweat the details, perhaps you won’t have to.

To dip beeswax tapers you need beeswax, a tall can, a double-boiler, and square, cotton wicking. The can will hold the melted wax, and should be taller than your tapers. (Tapers need to be tall because they’ll shorten up when twisted together.)
The nitty gritty details are all below. Before I frighten anyone off, let me mention our magical procedure. We made the dipping into a kind of processional. One kid dips, walks around the table. Next kid dips, walks. By the time the first kid gets back to the wax, the tapers have cooled enough to accept the next coat. Meanwhile, the students sustain a slow, ordered circling around the table. (Quite a departure from our usual frenetic clip.)
They loved it. The loved the transformation of solid to liquid to re-formed solid and they loved their new ability to tame hot, rather dangerous wax. Most—not all—loved the earthy smell of the beeswax itself. Had I given them world enough and wax, they’d have surely dipped each cotton wick until it was the size of a swim noodle.

our candles, ready for wick-trimming
Why Beeswax?
Beeswax is a must because I want the materials to be as “natural” as possible and because beeswax smells divine, burns longer than paraffin, and should be pliable enough for 8 and 9 year-olds to braid or twist tapers into a convincing, multi-wick candle. Also, because I am a volunteer Tennessee Naturalist, I look for any opportunity to inject the thought that “pollinators are our friends.” I bring a jar of honey with the honeycomb inside to show and taste. I want the kids know that the beeswax in our candles comes from the bodies of European honey bees (and also to notice that each comb cell has 6 points, sorta like a Jewish star….).
See below for types of beeswax available.
Procedure details:
Each student holds a double length of wick (in a homemade jig to keep the string even and to keep fingers higher out of the wax). Student A steps up to the can, dips down (2 seconds) and up (2 seconds), drips the excess back into the can (2 seconds), then walks around the table. Student B does the same thing, and then Student C… Repeat until tapers are the thickness desired.

strangely meditative…
Stop at the thickness of a fine marker (as opposed to a broad marker). A thinner taper is quicker to warm throughout, and warm means flexible and less likely to crack.
To join the tapers, dip and then gently press the entire length together. Dip again to seal and warm, and than start gently twisting the tapers. Keep warming and twisting.
The last thing: cut the wick in the middle (the part in the jig), which produces one candle with two separate wicks.
When I program this again, I’ll definitely have everyone dip three tapers at one time. Although two wicks are “kosher,” three will seem more generous and, frankly, more attractive. Some of our doubled tapers look a bit like BBQ meat forks.
Although my class-time ranges from 20-30 minutes, we might be able to manage three now that I know to keep the wax at the right temp.
THE NITTY GRITTY:
How Much Wax: You’ll need to do the math to figure out the volume of wax needed to fill your can and give you the right number of candles. This made my head hurt. I ended up just buying all the wax on the shelf at the craft store and hoping for the best. Turns out, 3 lbs of wax was enough to fill my can and keep it topped up as 13 students made two tapers each. The can is still 1/2 full and can wait intact till next time, when I’ll top it up for another round. My can details are below.
How to Heat: A double boiler is necessary because beeswax is easily scorched. I made one out of an electric skillet and a stock pot full of boiling water. The dipping can sat inside the pot. The nifty thing about using an electric skillet is that the plug has a temperature indicator. Beeswax melts at around 145 degrees F. After it liquifies (it took mine 2 hours), keep it just hot enough to remain liquid. Too hot, and it melts right off the wicks. The other neat thing about using an electric skillet is that it offers the portability to do all this in a classroom, or, weather permitting, outside, where clean-up would be comparatively simple.
Some folks use a crock pot, but I needed something deeper. One website uses a plastic baby bottle in a double boiler, which would be perfect if you only need two or three tapers, total.

I ended up with a triple boiler, but you just need a double…
Materials:
- Beeswax to melt.
- Wicking (square braided for beeswax) (10 yards is enough for 13 students to make 2 tapers)
- Tall can in which to melt wax. At least a couple of inches taller than your tapers, but narrow to reduce volume of wax needed
- Electric skillet (tape the cord down w/ blue painter’s tape)
- Large pot in skillet, filled with water (set can inside this)
- Wooden dowel to stir wax (chopstick isn’t long enough)
- Newspapers (without gruesome news) to cover table and on floor
- Large paper clips bent as jigs to hold the wicks (see my pics)
- Dowel stretched and taped across two boxes to hold finished candles
- Post-it note name tags for each candle set, with clothes pin to attach (or students will freak out that they have the wrong candle)
- Electric kettle to boil water to add to double boiler (to speed melting)
- Hammer to break bricks of wax (unless you buy wax pellets)
- Blue painter’s tape (to tape electric cord to table, floor, cupboard and wall). OH MY GOSH, do NOT use the beige kind. It never comes off. I’ve lost fingernails over the beige kind.
Advance Prep:
- Melt wax before class starts. Can take 2 hours if using chunks. Sustain at temp just high enough so that it remains liquid. Not too hot or the wax won’t stick to the wicks well. Beeswax melts at 145 degrees. Keep some unmelted wax aside so students can see, touch, smell and add to can.
- Cut wick into twice taper length plus an inch or two, fold in half, insert in metal jig to hold. This will give two tapers of same length, plus room for fingers. Finished candle height will be shorter after it is twisted or braided.
- Make sure depth of wax is at least the length of the wick: if the wick is too long, it hits bottom of can and curls up.
THE CAN:
If you can’t find a can tall enough, just put two together. As long as the seam isn’t below the water line of your double boiler, you can connect the two cans with duct tape on the outside. Don’t read the next paragraph below unless you find yourself embroiled in your own can saga.
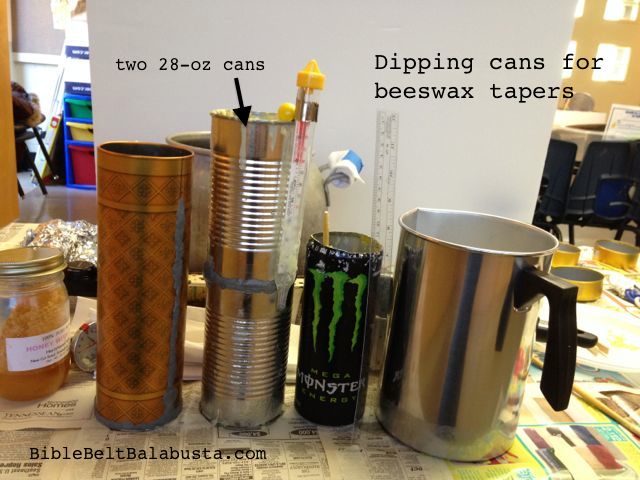
Evidence of my quest. The double bean can is about 12 inches high. The winner.
Can Saga: My own search for a can nearly did me in. It gave me fits. I couldn’t find a can taller than, say, a giant can of V-8 juice (which is the same size as a 50 ounce can of green beans if you were wondering). Store-bought Wax Melting / Pouring Pitchers were too wide (which meant I’d need extra wax to fill it) and still too short. After trolling through grocery stores (biscuit tins, energy drinks, beer cans, Mexican devotional candles and so forth), fiddling with disposable foil sheets and canning jars, I made my own. Bush’s vegetarian baked beans (kosher) happen to come in a 28-ounce size the perfect width and half the perfect height. So, I opened the top of one can and the top and bottom of a second can, (saving the beans), then joined them to make one tall, narrow melting can. I couldn’t attach them with duct tape because the seam might be lower than the level of water in my makeshift double boiler, and duct tape isn’t usually rated for underwater use at 145 degrees. Instead, I “glued” them with this marvelous thing called Plumber’s Epoxy Putty. Just pull off a glob, knead it in your hand for a minute, and then you’ve got three minutes of work time during which you may smoosh it on the outside of the seam. I let it cure for an hour, tested it, patched a couple of tiny leaks, and then that can was done. The putty is amazing. I fixed my gutter downspout at the same time.
BUYING BEESWAX: Ideally, you can get yours from a local, “sustainable” bee keeper and establish a relationship you can call upon for Rosh Hashanah honey later. Or you can buy beeswax bricks or pellets. Pellets melt a HECK OF A LOT faster than bricks, which is important if you don’t have a couple of spare hours before class starts. The white is bleached and won’t have the same fragrance as the yellow. Buy more than the volume your can will hold, because a) each dip will remove a surprising amount and b) it evaporates and c) you need to keep the wax level topped out to make sure the tapers are all the same height.
Yaley brand is popular, and easily found online. Michael’s Craft Store and Hobby Lobby tend to carry candle-making wax and supplies in store, but JoAnn’s does not, at least in Middle and East Tennessee….
BUYING WICK: Square cotton braid wicking is recommended for beeswax. If you use another type, your candle may smoke or sputter or not burn properly. Buy it in lengths for tapers and allow for wiggle room between. For example: if you want to dip two 12-inch tapers at the same time, your wick will be 24″ plus an inch and 1/2 or so in the middle for the jig or for your bare fingers.

not required, but it does keep the tapers apart while you dip
JIG: A satisfyingly hardware-esque term that just means “the thingy that holds the wick while you dip.” I bent large paperclips to make two loops that separate the tapers and keep little fingers above the wax level.
You don’t have to have a jig at all.
When we do three tapers, I’ll have to make a jig that holds three wicks…
TROUBLESHOOTING:
•Kids can’t reach the wax. Make sure your table is low enough for students to dip comfortably. Too high, and kids can get burned when they lower the wick. Ideally, they can see into the dipping can.
•Wick is not hanging straight. Just pull it straight down when the wick is still hot and wet. Do this a couple of dips and then it will stay straight. You do not need a weight at the bottom.
•Wick curls at the bottom. Wax level is too low or wick is too long. Try straightening out with fingers while wick is warm.
•Tapers don’t seem to get soft enough to twist. Hold them down in the wax a bit longer, grab them as soon as you can withstand the temp.
•Hands leave marks on the tapers. You are grabbing the tapers too soon. Wait just a couple more seconds and test surface of taper with a finger. You can always melt marks off with another dip, or a dip in very hot water.
•Tapers crack. Melt them together with a hot dip in the wax.
•Tapers are too broad at the bottom. Your wax level might be getting too low. Add more wax. Or, turn candle upside down and dip (you can pull extra wax off the lighting end of the wicks later).
•Wax is not building up on the wicks. Wax temp is too high and is melting right off again. OR, students are keeping wicks submerged for too long a time. Maximum is about 2-3 seconds.


In a word………..BRILLIANT!!
This fellow teacher really appreciates the “unpaid prep hours” and “many a migraine” that go into every new art/craft project. But, Joanna, I have two questions: How long did it take you to create this incredibly detailed post? And are the baked beans going into cholent, or do you have another exciting recipe in mind?
toda raba.
Lynne
Thanks, Lynne! I’m a little embarrassed at the length of this post, but I had to let it all out. It was time to be done with the subject. And I’m such a packrat I already had one of those empty cans in storage, so there wasn’t any need for a massive cholent.
Always a pleasure hearing from you,
Joanna
Please do post the “how to” on the rolled beeswax sheet candles. Wondering how long to make each one so that kids can braid them and be right size. How many thin candles can you get out of one “sheet” of beeswax? Thanks so much. Trying to do this in 2 weeks with my Shabbat School class of 1st graders. 🙂 Estee
Estee, will do! I’m working on it and will hurry.
Short answer: each thin taper starts as a sheet only 2″ wide and “however” long. The “however” is up to you, but is usually 8″ to 16″ long (limited only by the original length of the beeswax sheet.)
Many manufacturers sell sheets 8″ x 16″, which you could trim (with a ruler and a knife) into sheets of 2″ x 8″ and get a total of 8 thin tapers, which would make four Havdalah candles (with 2 twisted tapers) or two Havdalah candles (with 3 braided tapers, plus a remainder of two tapers left over to combine with a taper from another sheet).
I don’t recommend trying to roll and braid 16″ tapers with First Graders unless the wax is super-de-duper soft (and doesn’t crack), the room is super warm, and the students are already good at braiding. 8″ tall tapers are still pretty and far less frustrating, and you get twice as many from a sheet of beeswax.
Feel free to email me: biblebeltbalabusta A T gmail.com
Pingback: Making Rolled Beeswax Candles for Havdalah | Bible Belt Balabusta
Oh my gosh. This is EXACTLY what I needed. I’ve been frantic trying to figure out how to do this, and every other post I’ve read did NOT leave me confident enough to go ahead with this activity. This has all the info I’ve been looking for! Thanks so much for taking the time to share the details.
Yay! And thank *you* for taking the time to tell me the details are helpful. Good luck with your project. I’m going to be doing this one again in a few weeks, too.