

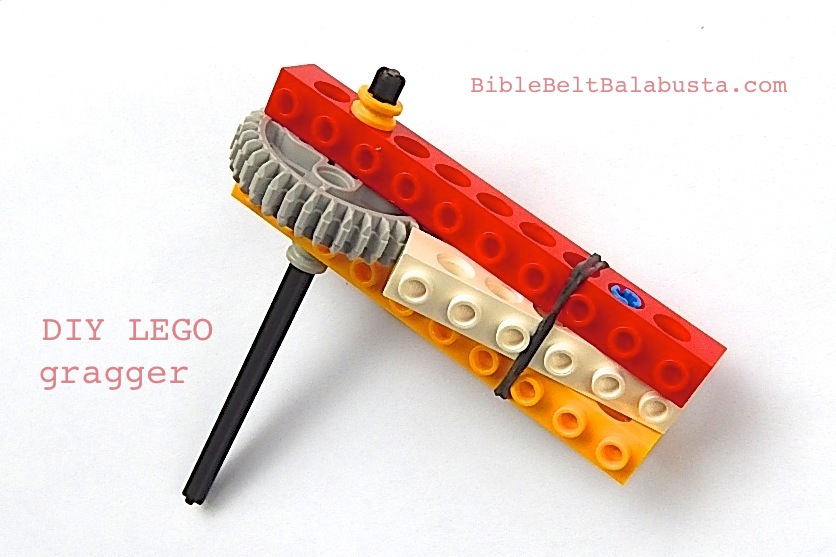
“EZ LEGO Gragger” with brick flange
The LEGO Gragger for Purim post was the official debut. It’s a “Why-To” with pics. This post is more of an extended How-To.
I’ve been asked for specs, so here are details that should get you started. I’ve already heard from one mom whose kids jumped right in and built their own prototypes. Made my day, I tell you. But some of us (adults) need how-tos, especially with moving parts. So here you go…
The function of a gragger is to make noise loud enough to drown out Haman’s name during a Megillah reading during Purim. My favorites are the massive, wooden jobs that are a menace to adjacent body parts. All my LEGO models make some sort of ratchet-y sound, but hardly enough to drown out Haman’s name, unless the Megillah reader chants in an obliging sotto voce.

LEGO graggers
Parts is Parts:
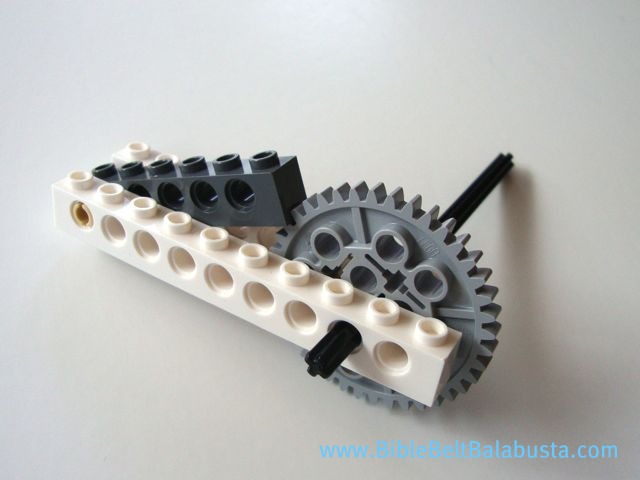
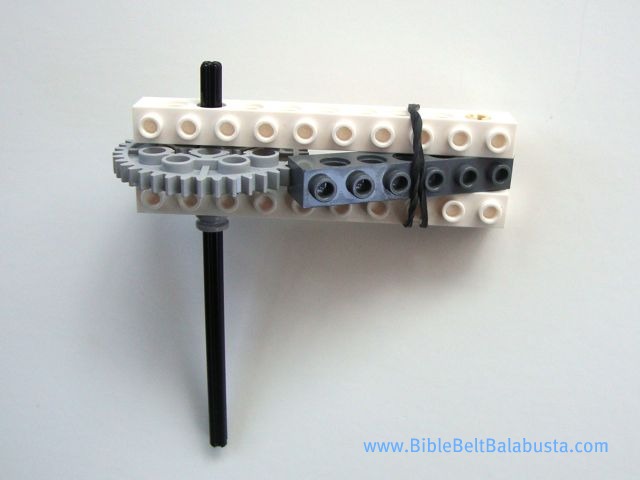
Every traditional gragger, no matter the materials, needs a gear-wheel on a handle. A flange (thin, slightly flexible or rigid board) rotates around the fixed gear-wheel to produce a ratchet noise. My graggers are built with parts from the LEGO Technic line: gears, cross axles, bushings, bricks, plates and beams, plus some odd bits from regular LEGO and minifig accessories. I used rubber bands on two models, which you might think is cheating, but LEGO actually makes rubber bands. Anyway, I had to secure linear elements at a weird angle, and LEGO bits don’t like weird angles, as a general rule.
Any size LEGO gear will work, but the tricky part is to find a flange the right length and size, and to mount it so that it hits the gear-teeth just right. I’ve used a minifig sword, minifig canoe paddle, antennae, minifig shovel, Harry Potter’s wand, a short cross axle and a Technic brick. I’m trying to figure out how to mount a LEGO fish as flange, because I am nothing if not thematic, and fish are a [wacky] part of the repertoire of Purim symbols.
INSTRUCTIONS
I named the one at the top of the page the “EZ Gragger” because it doesn’t take a lot of fiddling and the rubber band makes for good friction, sturdiness and so far, the loudest noise. (If you’d rather build one of the other models, just click on the individual pictures from the Debut Post (here) and see what I used. Holler if you need help.)
Note: It takes way more time to read the directions than to assemble. Start with a click on the thumbnail gallery below to see the slideshow as you build. You might not even need to read anything if the visuals are clear. This is my first time to explain a MOC (my own creation), so be sweet.
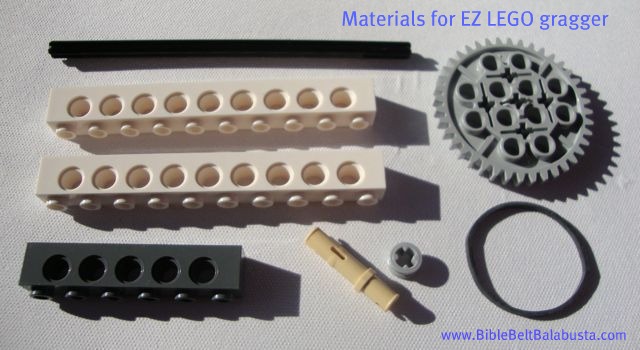
Bill of Materials:
* Cross axle (12-stud is best) (LEGO part #3708)
* Gear (40-tooth is the biggest and most impressive-looking) (LEGO part #3649)
* 2 1×10 Technic Brick (not a plate, not a beam) (LEGO part #2730)
* 1×6 Technic Brick (LEGO part #3894)
* 3-stud-connector peg/pin (LEGO part #6558)
* small rubber band (LEGO brand or office supply or Rainbow Loom)
* Bushing (Full or Half-Width) (necessary only if the bricks shift during twirl) (half=LEGO part #4265C; full=LEGO part #3713)

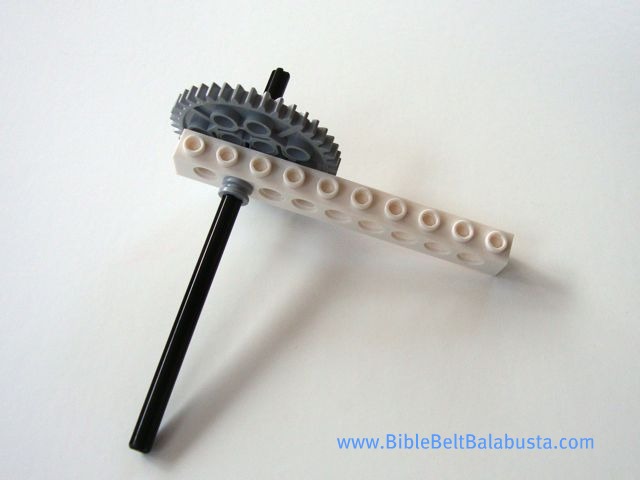
- Insert cross axle into middle hole of the gear. You’ll want less than inch of axle poking out of the top.
- From the bottom of the axle, thread a 1×10 brick through the second hole. Snug it up under the gear.
- Thread a bushing under the brick to keep it steady as you continue.
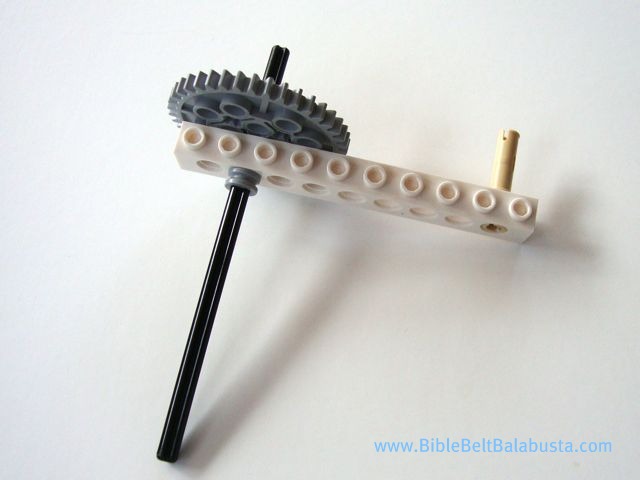
- Insert the 3-stud-connector-peg in the outer hole of brick (the hole farthest from gear), the “short” end first. Insert so that the bottom of peg is flush with bottom of brick.
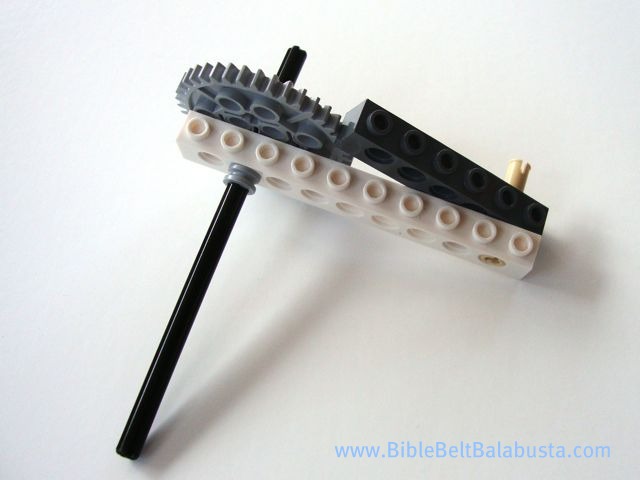
- Attach the 1×6 brick to peg by pressing the farthest hole onto peg. Note the orientation: the studs of both bricks are facing toward you (see pic). Let the new brick hang there while you keep going. You will secure it with the rubber band soon.
- Thread the other 1×10 brick onto the top of the gear, again through the second hole, so that it is a mirror image of the lower brick.
- Secure top brick to the two bricks below it by pushing it onto the top exposed portion of the peg. Now all three bricks are joined by that one peg. Peg should be flush with the top and and bottom surface of bricks.
- Take middle brick (the 1×6) and make sure it is rotated, stud-side out, so that it rests against the gear teeth. It sticks out at about a 25 degree angle.
- Wrap rubber band around the three bricks, so that the middle brick, the flange, rests against the gear teeth. Make sure the band is in the middle of the six studs of the 1×6 brick: three studs on the right, three on the left. No kidding, it makes a difference in the spin.
- Spin gragger counter-clockwise. Noise!
RESOURCES
LEGO parts:
I had tons o’ LEGO, but no Technic pieces. I bought a few Technic sets to start with, just for the parts. You can also buy individual pieces. There’s the Pick-a-Brick page at LEGO.com, but they don’t stock everything. Ebay is good source. The Brothers Brick has links to several retails sites with prices that are better than LEGO.com and far more comprehensive. My favorite brick-buying site is BrickLink: you can create a Wanted list of all your parts (by project, in case you have more than one on the go), and then search for a single vendor to supply.
Or…..LEGO Technic beginners might appreciate a book I found in my search. A LEGO gragger-like device called the Annoy-O-Matic is part of Crazy Action Contraptions, published by Klutz (here’s the link at Indiebound.org). The book comes with all parts required to make the Annoy-O-Matic and 15 other projects, including a goofy escapement device some non-Southerner named “Tennessee Time Killer.” Puleeze. As if all Tennesseans sit on saggy porches with nothing to do but clean our shotguns and wait for the beans to boil. Anyway, the Annoy-O-Matic makes a perfectly good, no-frills gragger. I ordered the book just to get my hands on the extra gears and axles. After all, I live in Tennessee, so I have a lot of time to kill.


Pingback: LEGO gragger for Purim | Bible Belt Balabusta
Holy cow! This website is AMAZING!!!!
Thank you, Tiz!
My kids are enjoying building the gragger, they came up with several variations using the pieces we have.
Great website; we will definitely be visiting often!
Excellent work! I sure would love to see pics of their Lego gragger versions. Please feel free to upload to my facebook page. And thanks for the compliment!
You are marvelous! Such wonderful ideas! I love your site!
I always try to find ways to make our Yiddishkeit fun and engaging for my little one. Your site is full of great ideas.
I’m two years late finding your comment but I thank you very much!
Pingback: LEGO Purim: Four Mitzvot | Bible Belt Balabusta
Pingback: Celebrate and Learn About Purim This Weekend « Read More. Play More. Learn More. Brought to you by Parents' Choice Foundation Read More. Play More. Learn More. Brought to you by Parents' Choice Foundation
Pingback: Celebrate and Learn About Purim This Weekend « Read More. Play More. Learn More. Brought to you by Parents' Choice Foundation Read More. Play More. Learn More. Brought to you by Parents' Choice Foundation
Pingback: DIY Lego Gragger - Etzly
Pingback: How To Be Jewish On Purim | TC Jewfolk
I came from Chai and Home for the groggers and stayed for all your other great content! I am from the Bible Belt (living just barely north of it now in St Louis). I am excited to add you to my daily reads!
Thanks so much! Glad you found stuff you liked.