

PVC Menorah, ready to disassemble and reassemble
The finished PVC menorah worked beautifully at the Chanukah Carnival. The volunteer who staffed that station devised a great ploy to generate interest: he left it half-assembled and then asked kids if they would like to “help finish it.” They sure did. Boys and girls, I am pleased to report, in seemingly even numbers. Leaving it half-built was a wise move. This left just enough of the structure up to entice would-be builders, yet not enough to look finished (and therefore not as alluring). If he had disassembled the whole thing between turns, the kids would have seen nothing to draw them to the table.
Setup: I put everything on a huge baking tray on a card table. The tray was the working surface, and the raised sides (like a jellyroll pan) kept pieces from rolling to the floor.

Hardware “flame:” machine screw, nut, washer, wire nut.
Prize: kosher Hebrew bazooka gum. Bazooka Joe in Hebrew is always thrilling, even if the gum is concrete. Kids get a prize just for trying, but my volunteer made sure they all succeeded.
Based on invaluable feedback, I tweaked the design. If you’d like to read the post wherein I applied for advice and wherein I relayed other details about invention, purchase and construction, see it here. But otherwise, here’s a reminder of my goal:
To provide a building station at the carnival. Kids assemble a menorah from bits of PVC pipe. They don’t get to keep the menorah and it won’t actually work (as in, it isn’t wired and it isn’t fire-safe for candles or oil). No, the real goal is the process: for kids to figure out how all the pieces can fit together properly, and then to take them apart for the next person to try. They can choose to make a 7-branch Temple Menorah or a 9-branch Hanukkah Menorah (Hanukkiyah).
Here is new revised Bill of Materials.
PVC HANUKKAH MENORAH (aka Hanukkiyah):
- Ratcheting PVC cutter tool (cuts to 1 5/8″ dia.) OR a hacksaw
- 2 90 degree elbows
- 6 Tees
- 1 Cross
- 9 pieces of 1/2″ PVC pipe, cut about an inch and a half long. These act as couplings, to connect the Tees and Crosses to each other. Do not use ready-made couplings, as they will not work. Neither will CPVC couplings (too slippery).
- 1 PVC bushing sized for 1/2″ pipe. This will elevate the shammash candle. Use with one of the couplings between the cross fitting and the candle. See photo.
- Candles (9 pieces of 1/2″ PVC.) (Make these same length as the pieces for the stand, below. Mine are 4″ long.)
- Candle flames (see below)
STAND:
- 3 Tees
- 7 equal pieces of 1/2″PVC (same length as your 9 candles)
- 4 Caps (they bring the feet level with table surface and match level of Tee)

“lighting” the *candles*
CANDLE FLAMES: Anything you like, really. I wanted to keep the hardware theme going, so I eschewed artroom supplies like pipe-cleaners, tinsel, cotton, felt and so on.
I used orange wire nuts. (EDIT: I updated with red wire nuts, which are larger and even more fun to fiddle with.) Each wire nut is screwed onto the end of a 3″ machine screw. Under the wire nut is a washer (fender washers are ideal) which keeps the wire nut from falling into the hollow candle, and a metal nut, which keeps the washer from slipping. (Machine screws are preferable because they have blunt ends that won’t hurt kids unless plunged with intent into another kid or self.) The long screws keep the flames secure in the candles. Short ones would be too top heavy. See photo.
You could use PVC caps as flames, but I was after something more fire-like.
Notes:
Keeping the candles and the stand legs all the same length means that everything is interchangeable. Truly modular. Someone suggested making the shammash candle longer, but in real life the shammash isn’t longer than the other candles, and the maker of any hanukkiyah has the real-life challenge of distinguishing that candle in another way. Could be by horizontal spacing or by elevating the candleholder.

exploded view (without caps on feet)
Visual guide: I kept two big photos on the table during the Carnival. One was of the finished hanukkiyah, and one was an exploded view. It’s nice to have visual backup with a room-full of different learning styles.
Blessings: If your situation allows it, you can teach/review the traditional placement of candles and the Hanukkah brachot, too. We put candles in from right to left, we light them from left to right (newest candle first). Have a copy of the blessings on hand if you intend to add this aspect.

PVC menorah kit set-up
Assembly/Disassembly: Don’t worry if some of the couplings get stuck inside the fittings. This really bugged me at first, but then I figured out it didn’t really matter. I included a pair of pliers in my carnival setup, for the perfectionist kids who just had to take everything apart. A small twist with pliers will ease stubborn couplings right out. Sanding the couplings only make them more stubborn, I find, but in theory, sanding should make them looser.
Paint: I decided not to paint because: I liked the rough hardware store allure, paint will chip and look hideous, and I wanted to keep the pieces as visually interchangeable as possible. In other words, I didn’t want to paint the candles one color, and the stand pieces (which are identical in size to the candles) a different color. The fewer rules, the better.
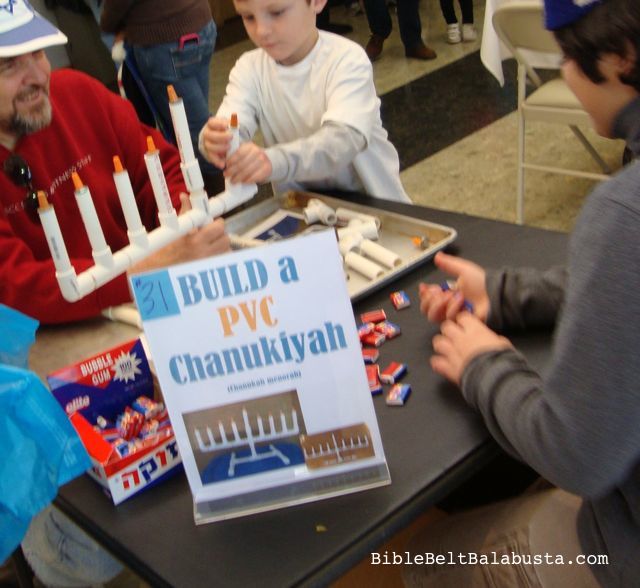
At the carnival: leave it half-built to attract customers


Pingback: PVC Menorah: advice needed | Bible Belt Balabusta
Pingback: Hanukkah Carnival Stations | Bible Belt Balabusta
Pingback: Menorah-saurus for Mr. Bill | Bible Belt Balabusta
Pingback: Handyman Menorah (DIY “Man-orah” for dorm or home) | Bible Belt Balabusta