

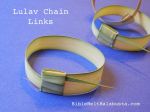
Lulav Chain garland
Here’s a nifty way to re-purpose your now superfluous lulav after Sukkot: a Lulav Chain for next year’s sukkah. All-natural, thematic, respectful (to a ritual object) and genuinely pretty. No staples, no glue. I find it strangely soothing to assemble the links as fast as possible, but taken at a leisurely pace, even older kids can join in and help “re-cycle.”
To re-cycle is way better than to trash. I shan’t soon forget the time I dumpster-dived to save dozens of discarded lulavim and etrogim tossed out with the garbage. Maggots floating too near the tops of my Wellies convinced me to abandon the rescue. But that’s another story.

Lulav Links
There are a few traditional ways to re-purpose the arba minim after Sukkot. My students and I already make Havdalah besamim from the etrog, and I already save the lulav for the bedikat and biur chametz prior to Passover (searching for and burning of the leaven).
But, as I fingered this year’s leftover lulav this morning, I had an urge to make something right now. Something easy and fast.
So, I invented the Lulav Chain. It’s a mashup of construction paper chains—the classic sukkah garland—and the traditional lulav “ring” or tie some of us use to bind the lulav before the holiday. The ring “pattern” I learned from our cantor years ago is different from my Lulav Chain link, but it was the inspiration. (Thank you, Cantor Weinberger.)
Yes, we could just staple the darn things together, but to fold and slide and pull them into place just feels more . . . kosher. Kosher as in “fitting.”
Yield: Each lulav leaflet can make two chain links, and as there are at least 30 leaflets on an average date palm spine, one lulav can yield 60 links, which is a good bit of Lulav Chain to drape from the roof.
If you want oodles of Lulav Links, or if you want to turn this into a group / classroom re-cycle project, ask local folk for used lulavim. Before Sukkot, I asked shul members to donate leftovers to my classes, and I’m hoping for quite a haul. I’ll let you know if 3rd graders like making these…
Here’s the HOW of making one Lulav Link:
Either watch the quickie video, or look at the photos below, or wade through the descriptions. Or all three. Or make up your own way and tell me about it.
All you need is a pair of scissors and a lulav.
Tip: Fresh and pliant leaves are easier to work with, but I just now made links from lulavim that are one and two years old. They worked, but the fresher the better, because fresh means softer and easier.
Do this flat on a table until you get the hang of it.
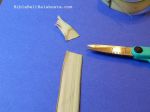
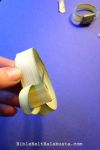
1. Peel off one leaf. It’s doubled, so open it up and tear apart at the fold. Now you have two pieces. Put one aside.
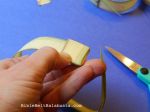
2. Cut off the tough bottom end where it was attached to the spine.
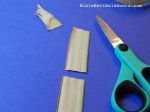
3. Cut off a length of the leaf that is approx. 3 times the width of the leaf. So, if the leaf is .5 inches wide, cut a piece that is 3 times that, or 1.5 inches long.
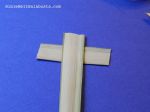
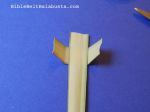
4. Arrange the short piece behind the top of the long piece, like a lowercase letter “t”. Do this on a flat surface for now.
5. Take the left and right ends of the short piece and fold them around the front of the long piece. They will not stay there without you pinching them shut.
6. Now fold the top of the long piece—which has been sticking up above the cross piece—over the front where the short piece flaps overlap. Now you should have what looks like a square (all sides equal) on top. It will still need to be pinched shut while you work.
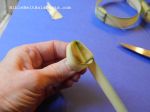
7. Now, lock that square with a “knot:” Bring the bottom pointy end of the lulav leaf up towards you and over the square to just behind the square….. See the opening? Thread the pointy end inside that and down the back. Don’t let go of the square yet. Pull gently till the long leaf is making a circle that gets smaller and smaller, tighter and tighter.
8. Now you should have another perfect square at the top of your leaf, but now it is “locked,” like a knot. No pinching required anymore.
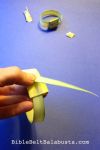
9. To make the chain link, just bring that pointy end up again through the gap in the same place: the top of the back of the square. But this time, stop pulling when you have a circle the size you wish.
I make my circles using my fist as a guide, so they are fairly uniform. If the circle can clear my knuckles, it’s the size I want.
10. To lock the circle, loop the pointy end inside the square as many times as it will go. Sometimes this is once, sometimes twice. Depends on the length of the leaf. I like the extra to poke out at the end, but you can trim it if you wish.
Done. Make the next chain from inside the first chain, and so on.

Lulav Chain links
Pictures below. Click for a slideshow at your own speed, but it seems to work best on a laptop, rather than a phone. Video link is here.


Holler if you try this. I’d like to know what works (or doesn’t work) for you.
Storage: I’m storing my chains inside plastic grocery bags so they don’t get tangled with the giant hooks and other stuff in the Sukkah Bin. They will dry during storage and emerge next year beige, narrower, and more brittle, but still work fine. Any rain will actually help plump and tighten them a bit.
MORE RE-CYCLED LULAV LOVE:
• Lulav Brush for Passover (Bedikat Chametz and Biur Chametz) Easy for kids.
• More Lulav Recycling Projects after Sukkot (mat, basket, bracelets, ornaments, etc.)


I LOVE this idea! What a clever to actually have some palm on our Succot’s roves! Thank you. 🙂