

Model Magic Hamantasch: mohn flavor
Who doesn’t love to play with Model Magic? Squidgy, lightweight, irresistible. Expensive, too, but I find it on sale and buy the big packs of white. It’s ever so much fun to color blobs of it as needed, just by poking at it with a washable marker and kneading until the new color is smooth.

adding color with a marker
Model Magic comes to the rescue of my art classes, with whom I will not have time to bake the really-real hamantaschen, even my slacker version. This is a bummer for me, and I suspect for the kids, too, as most do not get the chance to bake at home. But, one 25-minute class is time enough to go through the right motions and still end up with cute fridge / locker magnets destined to mystify non-Jewish friends.
Model Magic Hamantaschen:
Give each kid a white chunk the size of a golf ball, and let them poke blobs of brown marker all over it. Show them how to knead the color until blended. Kneading this stuff is sensorial heaven: foamy, smooth, never sticky.
Keep adding color until a convincing, hamantasch-dough beige shade is achieved.
 Roll this into a sphere on the table or in the palms, and smoosh it flat with the bottom of a drinking glass. The kids love to do this step, and to look at the clay through the glass as it gets smooshed, so pick a clear glass with a big, flat bottom.
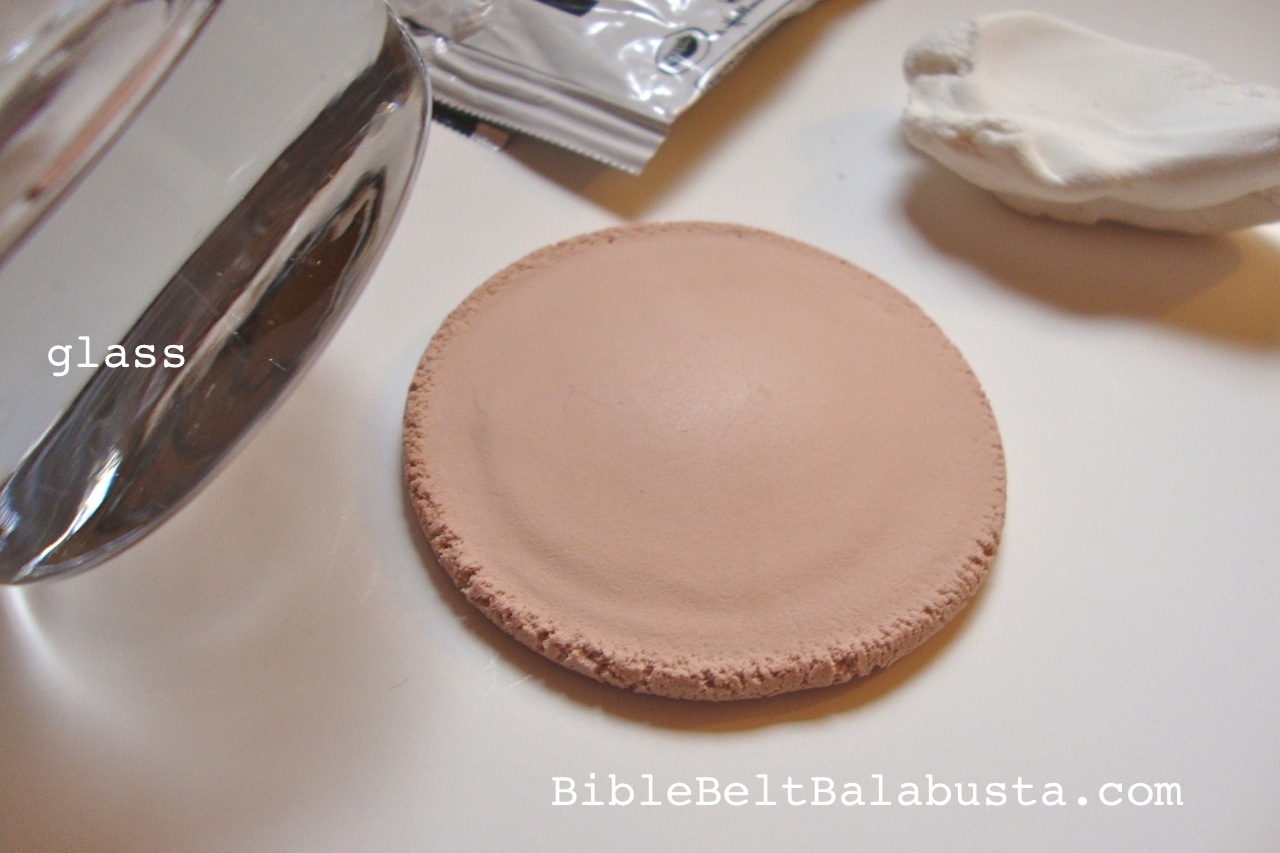
freshly smooshed with an iced tea glass
The “filling” can be a marble, a checker (especially the kind with a crown in bas-relief), a colored cardboard circle, a painted wooden token, etc., or a blob of Model Magic in a different color from the dough. Note well, though: Model Magic sticks to itself. So, if you fold the “dough” over a soft blob of fresh, colored filling and then wish to reposition, you are doomed. The perfectionist streak in certain children will result in the new color comprised of dough and filling smooshed together in frustration: the proverbial “preschool gray” feared by teachers.

mini checker filling (with Esther’s crown…)
The urge to reposition is powerful and must be honored. To make a triangle cookie out of a circle can be a fine-motor, spatial-awareness workout. Even older kids forget how to do it after a whole year of not making hamantaschen. (See my folding-practice post.)

“mohn” (poppy) filling: aka blob of dried black clay
To avoid this inevitable outcome, I provide marble-size blobs of already dry Model Magic in colors that match traditional fillings: black (mohn / poppyseed), brown (lekvar / prune butter), orange (apricot), and red (cherry). The fresh dough clay can be peeled off of the dried filling clay without eliciting tears of frustration. Crisis averted.
When the hamantasch is filled and folded, you can ever-so-gently press a magnet to the back, just enough to create an indentation, and then remove it. This indentation will make it easier for the magnet to stay glued to the finished, dry product about 24 hours later. So, let it dry without the magnet, then glue the magnet in its allotted place. Or, forget the whole magnet impression step and trust in the adhesion of a fabulous glue. Either way works.
BibleBeltBalabusta hamantaschen links:
- Nearly Instant Hamantaschen for Dorm, Class or Slacker Home
- Let the Hamantaschen Begin (baking w/ kids, different categories of hamantaschen)
- Can You Make a Triangle from a Circle (PlayDoh hamantasch folding practice and printable)


Pingback: Hamantaschen earrings made from modelling clay « Joyful Jewish
Pingback: Playmobil Megillah | Bible Belt Balabusta
Pingback: LEGO hamantaschen for Purim | Bible Belt Balabusta
Thanks for this! I’m going to do a Pesach project with my students (inspired by this post!), either seder plate magnets or let them do a few of the ten plagues. Do you highly recommend the Model Magic over a different clay? Also, any magnet recommendations for this? Thanks so much!
Great, Myriam! For tiny detail like a seder plate, Sculpey (any brand of polymer) clay is my favorite. (I’ve made them about the size of a 50 cent piece with lower Elementary kids.) You can bake them in a toaster oven in the classroom. Perfect for plagues, too. Sculpey can be shaped into teeny tiny pieces, and if the kids don’t like what they’ve done, they can usually separate the colors back out and have a do-over.
Model Magic is air-dry clay by contrast, and better for less detailed projects. (That being said, very young children might make nice, blobby plagues with Model Magic.) Once Model Magic is stuck to another color, it doesn’t come back apart cleanly.
Magnets: I keep a supply of those packs of round, 1″ magnets and use them for everything. They are sold at all craft stores and some office and school supply places. Hot glue should work fine to affix one on the back of baked polymer clay creations. For Model Magic, see my magnet gluing advice in the post above.
I’d love to see photos of your process or product!
Great, thanks! I have fourth graders. I’ll use polymer. So glad I asked! I also did the besamim “bar” recently. Used fenugreek, coffee beans, chocolate nibs, rosemary, lavender, dried orange peel, mulling spices, and cinnamon bark and cloves (obviously!). It was a huge hit, and great to see them really interacting with a Havdalah project and getting really into it. Your site has been so helpful for my first year of teaching! Thank you!
Well, you certainly made my day. Thanks for letting me know!
Hey, I forgot to mention I have a post about making tiny seder plates with polymer clay:
And thank you!